Learn how to set up catch-all addresses in Google Workspace to catch all stray emails sent to addresses within your domain.
What exactly is a catch-all email address in Google Workspace and why would you need it? As an organization, you may encounter a situation where somebody either internally or externally, is trying to contact a person who is no longer with your company or uses an email address that does not exist within your domain.
When this happens, the original sender of the email receives a bounce message and the email will not be delivered at all. As an organization, you may wish to deal with such “stray” emails, by automatically directing them to the right places or “catch” all these “stray” emails into some “special pot address”. Retaining your ex-employees’ Google Workspace accounts needs an active license, which is an “idle expense”. No one wants to sustain this for long!
If you do delete the dormant user account, and an email is sent to that email address, the sender will get a bounced email, indicating the unavailability of the recipient’s email address. The lack of business continuity caused by the frustration of both internal and external parties can be costly to your organization. Set up a catch-all in Google Workspace to prevent this.
The best way to ensure that the sender does not get a rejected or bounced email after sending an email with no incurred cost on the dormant account, is by creating a compliance routing rule to catch and redirect the email to a group email account or to a user account, who would respond and advise the original sender. This can be achieved in the following ways:
Step 1: Delete “dormant” User Accounts (No License required and no Data Lost)
When an employee leaves an organization, the Google Workspace user account that he/she was using becomes dormant but continues to incur license charges. As a Google Workspace admin, you can delete dormant user accounts within your organization’s Google Workspace account so as to not incur any further charges.
Note: Before deleting a user account, it is always good practice to migrate the data to another account for business continuity purposes. Before you begin, make sure you have enabled IMAP on the source account and have the password for the account.
To perform email data migration:
Sign in to the admin console using a super admin account and go to Data migration.
Click Set Data Migration Up.
For Migration Source, select Google Workspace Account and click Start.
For Migration Start Date, accept the option that appears or choose a custom date from when you would like to migrate the data within the account.
Leave Migration Options blank or unselected as we want to migrate all email in the account without any exclusions. Click Select Users.
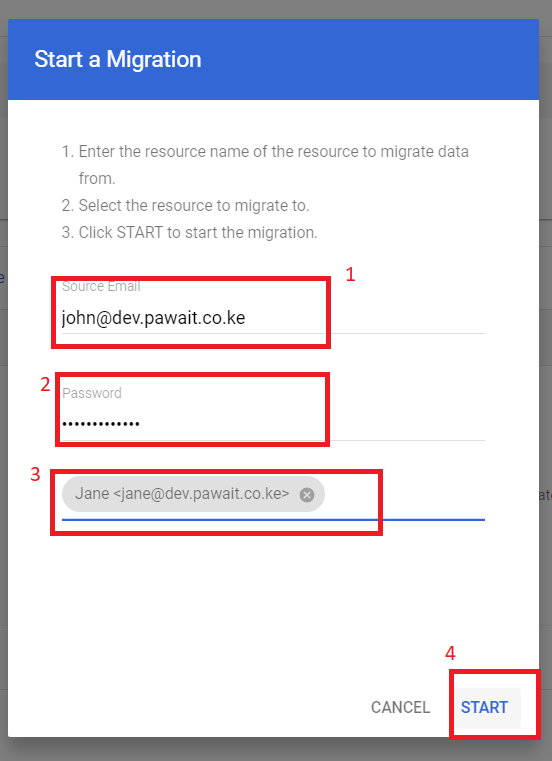
Click Add User and enter the following information details:
Start email data migration
For Source Email, enter the user’s Google Workspace email address on the source account e.g. [email protected]
For the Password field, enter the user’s password for the source email account.
For Google Workspace Email field, start entering the destination user’s Google Workspace email address and choose from the list of suggested users within your account e.g. [email protected]
Click Start
To migrate another user’s email, repeat the above steps.
To perform a Bulk data migration for multiple users, click Bulk Migration With CSV and follow the steps to use a CSV file to perform the migration.
Once the email migration is completed from one user account to another, the status of the migration will be marked as Complete.
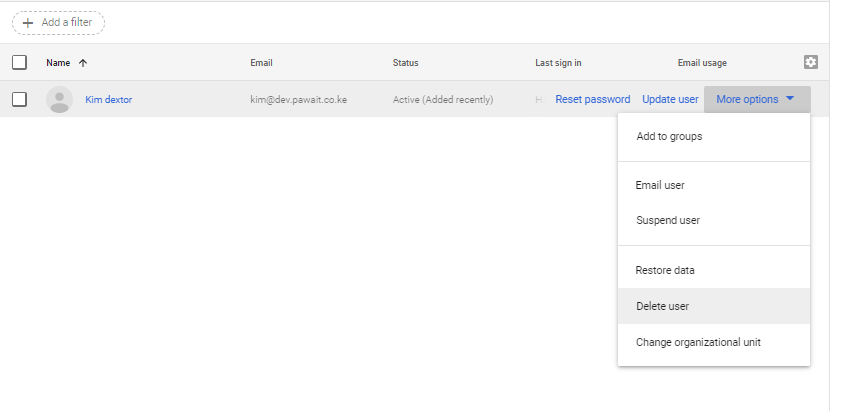
Select the user you want to delete, click More and select Delete User.
Initiate deletion of a user account
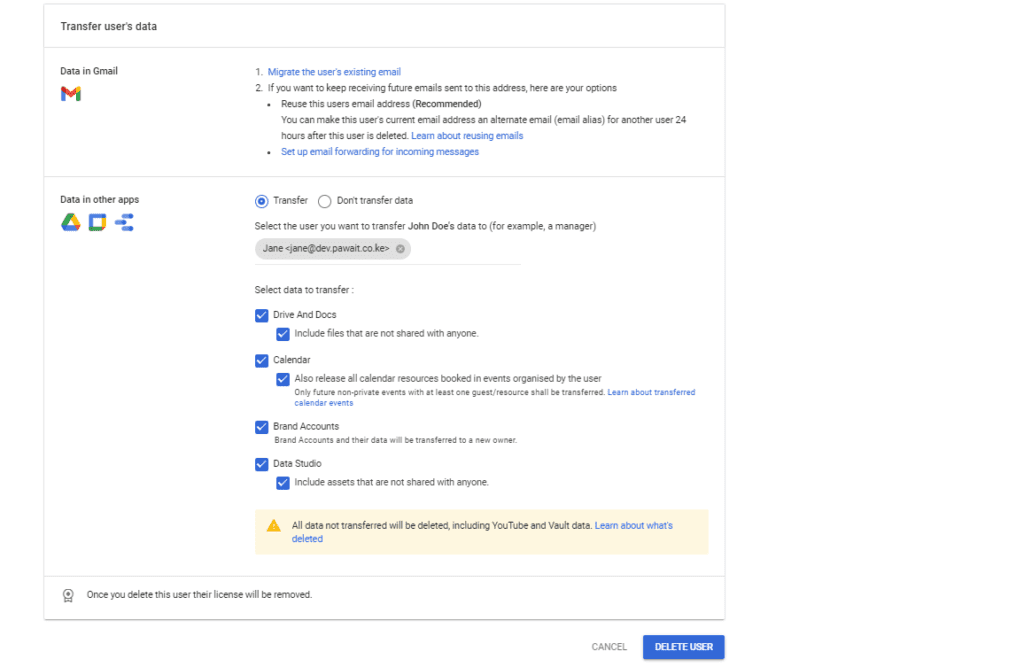
To transfer Drive, Calendar, Data Studio and Brand Account data from one user account to another user account, select the radio button next to Transfer, then type the user’s email address to whom you are transferring the data to. Select the data to transfer:
Transfer data in other Apps
Drive and Docs including files that are not shared with anyone
Calendar
Brand Accounts
Data Studio including the assets that are not shared with anyone.
If you choose not to transfer the data you can click on Don’t transfer data
Click Delete User.
Step 2: Create a Google group to receive the deleted user's Emails
To make sure your team never misses out on any emails sent to the deleted accounts within your domain, you can route the emails to a group emailing address that has members of the same department as the deleted users, or people within the organizations that you would wish to receive such important communication.
Steps to create a group:
Login to the Google Workspace admin control panel at admin.google.com
From the Admin console Home page, go to Groups
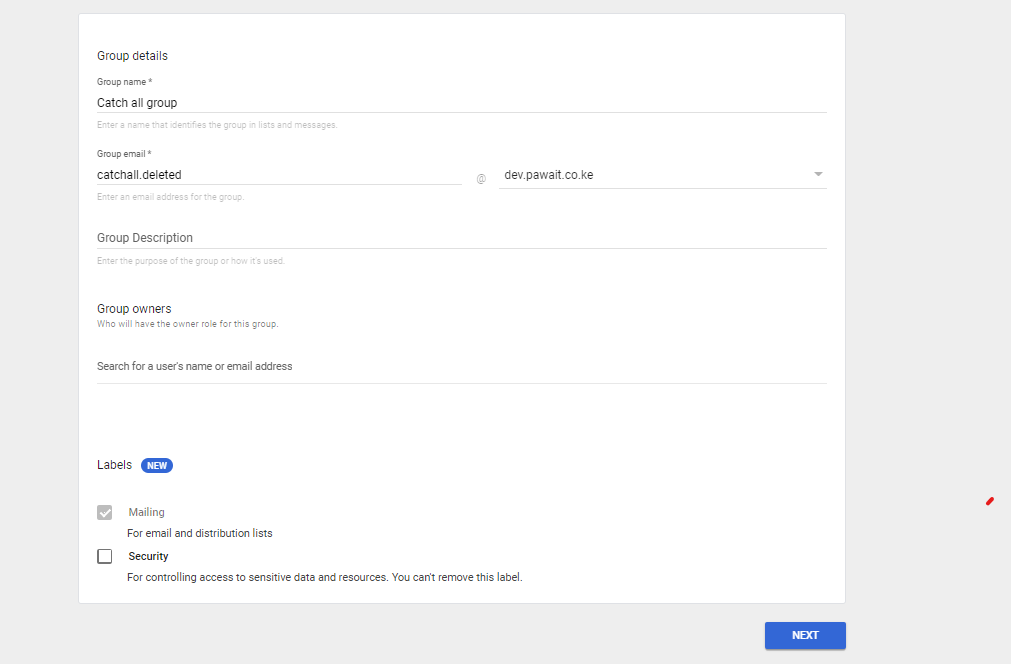
Click Create group and enter the Group details such as the name and email address for the group e.g. [email protected]
Group owners: (Optional) Search for the name or email address of users who will have the owner role for this group. Under label make sure to select Mailing. Once done, click Next.
Creating a group
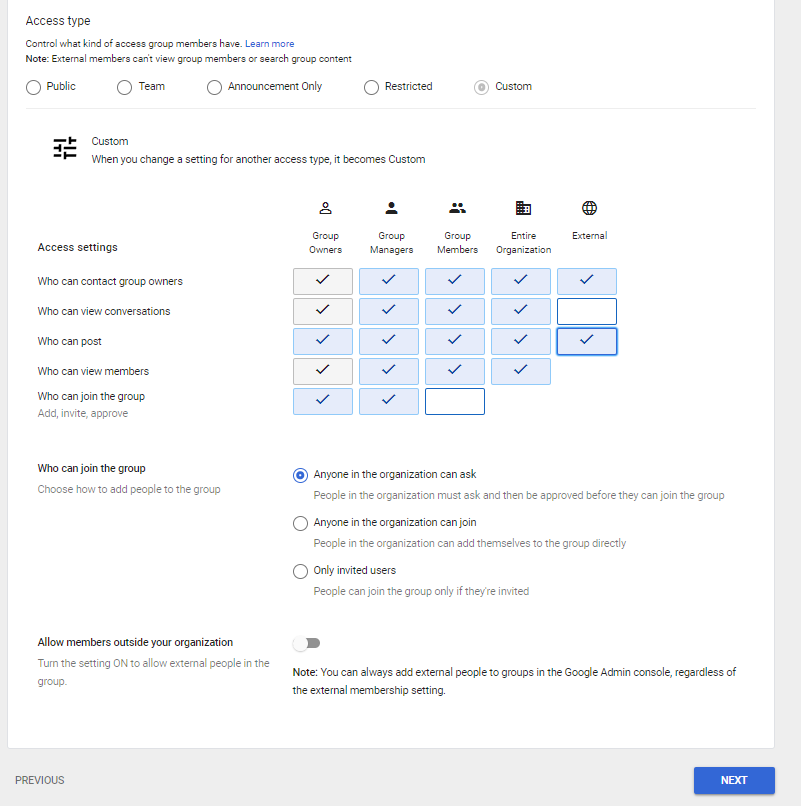
To set the Access Settings to allow the group to receive emails from outside your organization ,select against the checkbox to allow External users to publish posts to the group. This permission will allow “Inbound emails “ from any account.
Access settings to allow external posting to a group
Once done, click Next and then click Create Group.
To add members, click Add Members so as to add the users/members of the group who will receive emails sent to the group.
Search for a user by entering the first few characters of their email address. When you see the user you want, select them. Repeat this step to find and add more users to the group.
Click Add to group to complete the process.The users will be added to the group with the ‘Member’ role.
Step 3: Create a Catch-All Rule for a Specific Deleted user
To make sure the emails are routed and received to the group emailing address we created in step 2, create a catch-all routing rule, to affect the deleted accounts in step 1 above:
Sign in as a Google Workspace Administrator by logging in at admin.google.com
Click on Apps and navigate to Google Workspace
Click on Gmail to access Settings for Gmail and scroll down to Routing.
Navigate to Routing. To add a new routing rule, click on Configure , if a routing rule already exists click on Add Another Rule. This pops out a module for you to configure your routing rule:
First give your configuration rule a name e.g. Catch-all deleted users.
Under Email messages to be affected, select Inbound and Internal-receiving.
Scroll down to Also deliver to. Select Add more recipients and click Add to add additional recipients to receive emails that match our criteria.
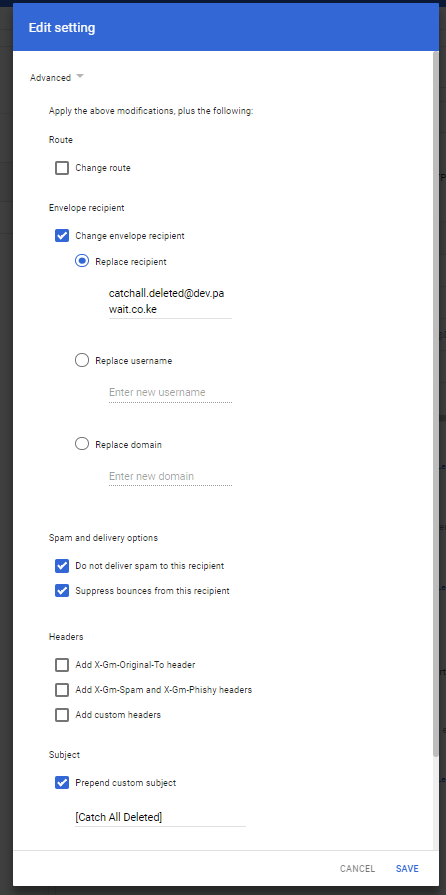
Select Advanced to add additional parameters. On the resulting configuration screen under Envelope recipients, select Change envelope recipient and then select Replace recipient and enter the email address of the group we created in step 2 to receive these emails. In our case it’ll be ‘[email protected]’
Alternatively, you can select Do not deliver spam to this recipient so as not to deliver any emails that are considered spam to this recipient.
Select Suppress bounces from this recipient. This option suppresses any bounce messages to the receiving server. This makes sure the sender does not receive a bounce-back message telling them their message wasn’t delivered.
Optionally you can choose to prepend the subject by adding a custom name before the subject to all emails received by the users within the group. To do this, select Prepend Custom Subject under Subject and give the subject a name e.g. [Catch All Deleted]
Click Save.
Configure advance setting to prepend subject
Click Show options, to display additional configuration options. Under Account type to affect, select User and Unrecognized / Catch-all.
Under Envelope Filter, select Only affect specific envelope recipients and add choose Single email address to enter the email address of the specific user account we deleted. e.g. [email protected]
To add multiple user accounts that you have deleted, select Pattern Match. This allows you to add a regular expression under Regexp. Examples of regular expressions.
Once done setting your routing rule, click Save.
Testing and outcome
You can do a test to see if you have configured everything properly by sending a test email to the deleted user(s).
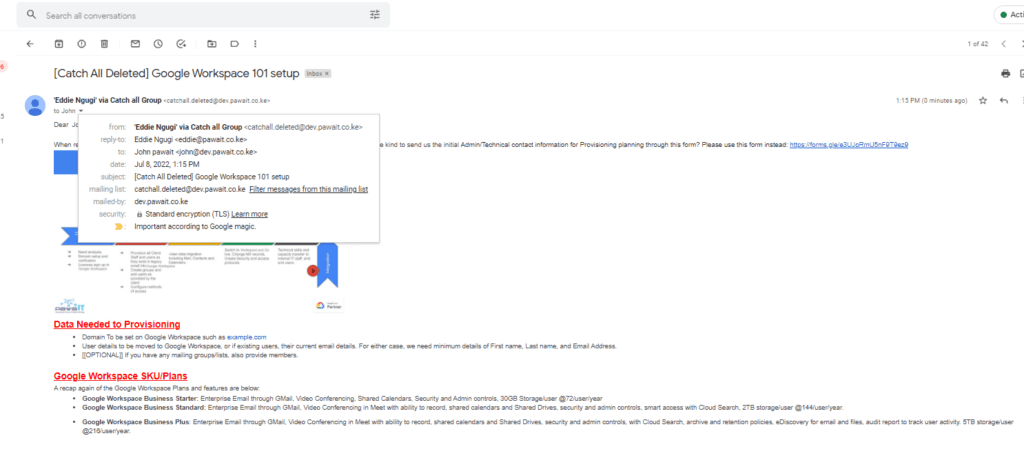
The email will be delivered to the “catch-all deleted” group, even though the email address to which it was sent was deleted (and missing) and hence be delivered as seen below:
Email received for the deleted email address within the domain
Step 4 - Optional: Create catch-all address for ALL/ANY Deleted user in Domain
Now, we have set up a catch-all email address for single users (accounts) that may have been deleted from steps 1 -3 in your Google Workspace domain. Suppose, you need to set a catch-all email address, for multiple users, some known, and some unknown, or even for addresses that may not exist in your Google Workspace domain? That is, say you want any stray email that may be sent to any address to your domain to not get lost?
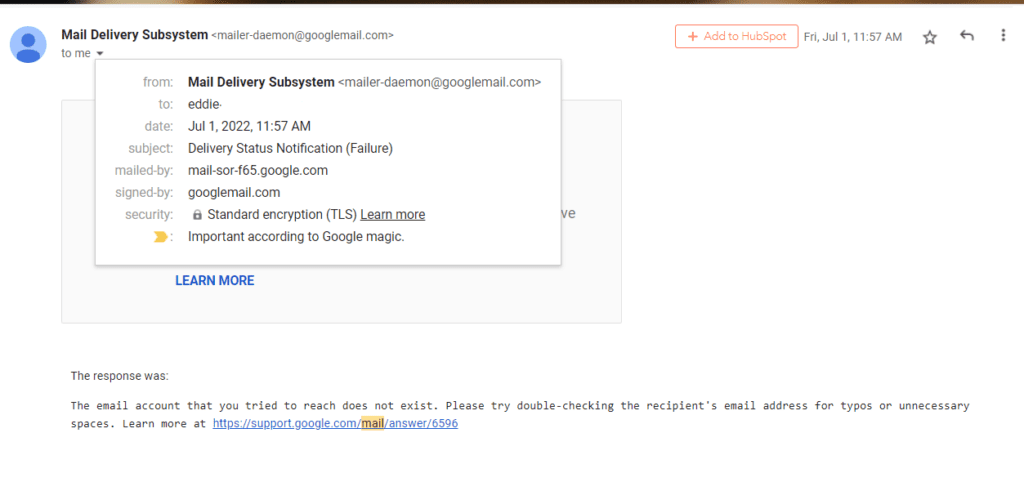
Well this is actually the true meaning of a catch-all email address and it’s true use. It is to catch all emails that get sent to your domain email addresses, known or unknown. Such emails are best “rerouted” to some address where they can be monitored for usefulness before they are discarded. Hence, the use of a special catch-all group creation applies. In this case, if any email is sent to your domain, the recipient doesn’t get a bounced email like the one below, as all emails will be delivered to the assigned catch-all recipient group or user.
Bounced email sent to the sender once an email is sent to a deleted or non existent user within your domain
Create a catch-all email rule to any unrecognized user account within your Google Workspace tenancy:
Sign in as a Google Workspace Administrator by logging in at admin.google.com
Click on Apps and navigate to Google Workspace
Click on Gmail to access Settings for Gmail and scroll down to Routing.
To add a new routing rule, click on ADD ANOTHER RULE this pops out a module for you to configure your routing rule:
First give your configuration rule a name e.g. Catch all astray.
Under Email messages to be affected, select Inbound and Internal-receiving.
Scroll down to Also deliver to and select Add more recipients. Click Add to add additional recipients to receive emails that match our criteria.
Select Advanced to add additional parameters. On the resulting configuration screen under Envelope recipients, select Change envelope recipient and select Replace recipient and enter the email address of the group we created in step 2 or another email group to receive these emails. In our case, the group email is : [email protected]
Alternatively, you can select Do not deliver spam to this recipient, so as to not deliver any emails that are considered spam to this recipient
Select Suppress bounces from this recipient. This option suppresses any bounce messages to the receiving server. This makes sure the sender does not receive a bounce-back message telling them their message wasn’t delivered.
Optionally, you can choose to prepend the subject by adding a custom name before the subject to all emails received by the users within the group. To do this, select Prepend Custom Subject under Subject and give the subject a name e.g. [Catch All Astray]
Then Click Save.
Configure additional settings to prepend catch-all astray
Click (Toggle) the Show options and make sure to tick Unrecognized/Catch-all
Click Save
Testing and Outcome
You can do a test to see if you have configured everything properly by sending a test email to a non existent user within your domain. Kindly note.
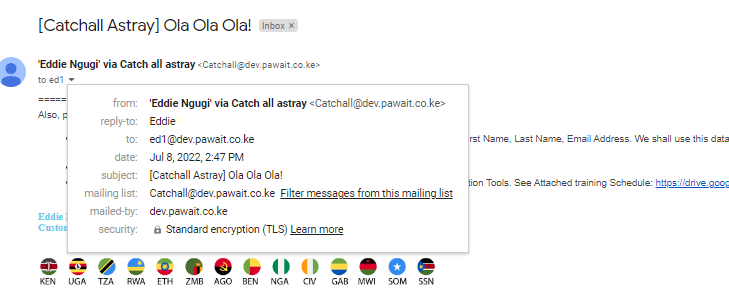
The email will be delivered to the “catchall astray” group, even though the email address to which the email was sent is missing or is non existent and hence be delivered as seen below:
Email received for a non-existent email address within the domain
Additional TIP
Since receiving emails that have been “catchall-ed”can be a daunting task if you are member of that Group, a good tip is to only view/read the emails via the Google Groups Web acces as opposed to having each email delivered to your inbox. This can be achieved by changing the subscription type to allow you to follow up on the emails via Google Groups and not get your inbox overwhelmed.Access Google Groups and locate the group in this case [email protected] and change the Subscription type to No EMail
Change Email Subscription type under Google Group
Our Spring Sale Has Started
You can see how this popup was set up in our step-by-step guide: https://wppopupmaker.com/guides/auto-opening-announcement-popups/
Our Spring Sale Has Started
You can see how this popup was set up in our step-by-step guide: https://wppopupmaker.com/guides/auto-opening-announcement-popups/
Our Spring Sale Has Started
You can see how this popup was set up in our step-by-step guide: https://wppopupmaker.com/guides/auto-opening-announcement-popups/