
Every day, our support team responds to the same urgent call: “Someone has accessed my work account.” What starts as a simple password breach quickly escalates into downloading sensitive files, sending fraudulent invoices, and compromising entire business operations. The harsh reality? A strong password is just your first line of defense. In today’s sophisticated threat landscape, relying solely on passwords is like leaving your office building unlocked after installing just the front door lock.
Google provides extra layers of security; let’s make sure you’re using them effectively! This guide covers three crucial security settings beyond your password that everyone should configure and maintain:
1. Two-Step Verification (2SV): The Digital Bouncer
What it is: 2SV (also known as Multi-Factor Authentication or MFA) adds a second layer of security when you sign in. After entering your password, you’ll need to provide a second piece of proof that it’s really you, usually a code sent to your mobile number or a prompt sent to your mobile phone.
Why it’s crucial: Even if someone steals your password, they likely won’t have your phone or security key. This is one of the most effective ways to prevent unauthorized account access.
How to Set It Up:
Enabling Organization-Wide 2-Step Verification
As a Google Workspace Admin, you can enable 2-Step Verification within your organization’s Google Workspace Account, to allow users to choose to use this feature if they wish, or you can enforce it as a mandatory security feature for each user’s account. Here’s how:
- Sign in to the Google Admin console at admin.google.com
- Navigate to Security > 2-Step verification
- Choose between allowing users to opt in or enforcing organization-wide 2SV
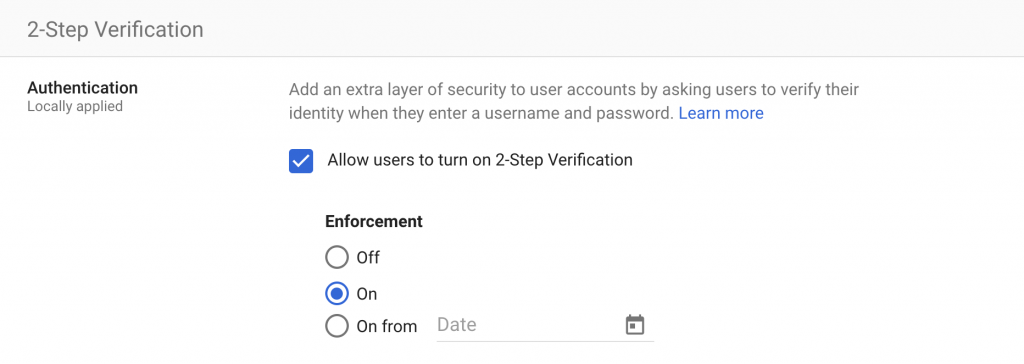
- Set implementation timelines and specify organizational units5. Configure enforcement policies for specific departments or user groups
Enrolling in 2-Step Verification On Each User Account
- Go to your Google Account: https://myaccount.google.com/
- On the left navigation panel, select Security.
- Under “How you sign in to Google,” select 2-Step Verification.
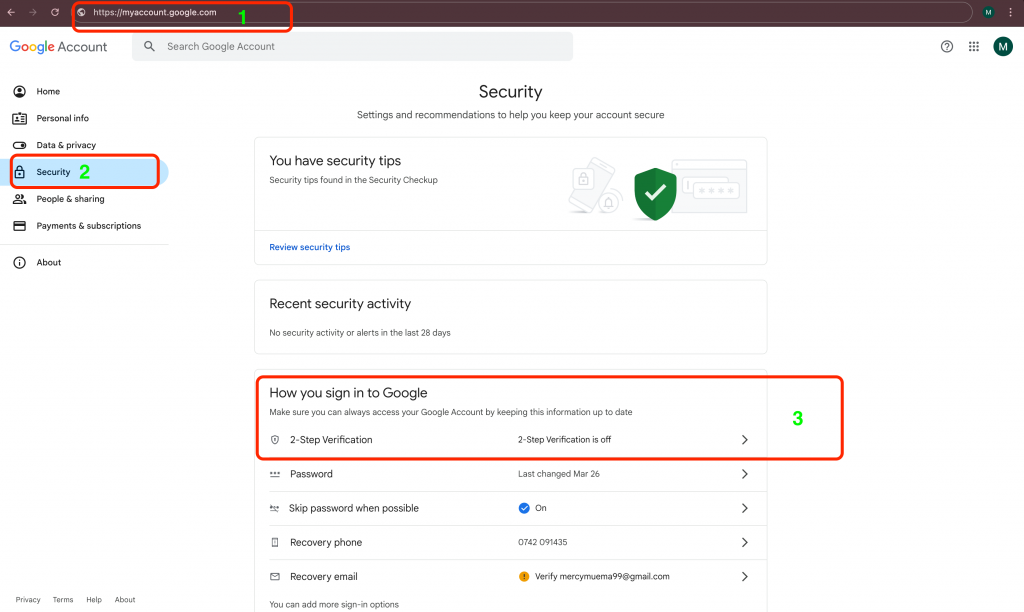
- Click “Get Started” and follow the on-screen instructions.
- Select options that work best for you.

Pro-Tip: We recommend using the Google Authenticator app or Google Prompts on your phone as reliable methods. Have backup codes saved securely offline in case you lose your phone!
Setting Up Essential Backup Methods
Don’t put all your security eggs in one basket. Configure multiple backup methods:
- Backup Codes: Download and securely store one-time recovery codes. Please print them and keep them in a safe location separate from your devices.
- Backup Phone: Add an alternative phone number for SMS or voice call verification.
- Google Authenticator App: Install and configure the Google Authenticator app as an additional verification method:
- Download Google Authenticator from your device’s app store
- In your Google Account security settings, select “Authenticator app.”
- Scan the provided QR code with the app
- Enter the generated code to complete the setup
2. Recovery Information: Your Spare Keys
Every Monday morning, the Pawa IT support team faces 3-5 urgent calls from customers locked out of their accounts. We’ve all been there, forgotten our passwords, and been locked out. The stark difference? Customers with current recovery information regain access in minutes with minimal support. Those without updated recovery contacts often require extensive identity verification processes that can take days and might involve senior management escalations.
What it is: This includes a recovery phone number and a recovery email address associated with your Google Account.
Why it’s essential: If you ever get locked out (forget your password, 2SV issues), Google uses this verified contact information to help you regain access securely. Without it, account recovery can be difficult or impossible.
How to Check/Update:
- Go to your Google Account: https://myaccount.google.com/
- On the left navigation panel, select Personal info.
- Scroll down to Contact info and check your Email (specifically Recovery email) and Phone (specifically Recovery phone).
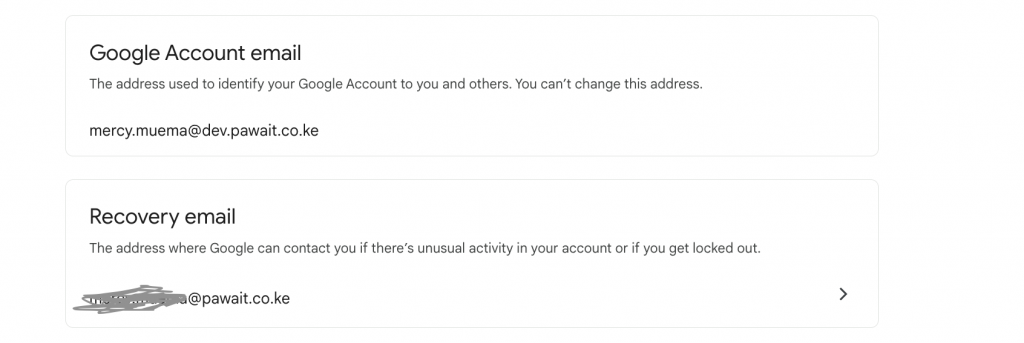
- Click on them to add or update if needed.
Crucial Best Practice: Ensure your recovery phone number is current. Your recovery email should be an address you access regularly and preferably one hosted outside of your main Google Workspace account (e.g., a personal Gmail or other provider).
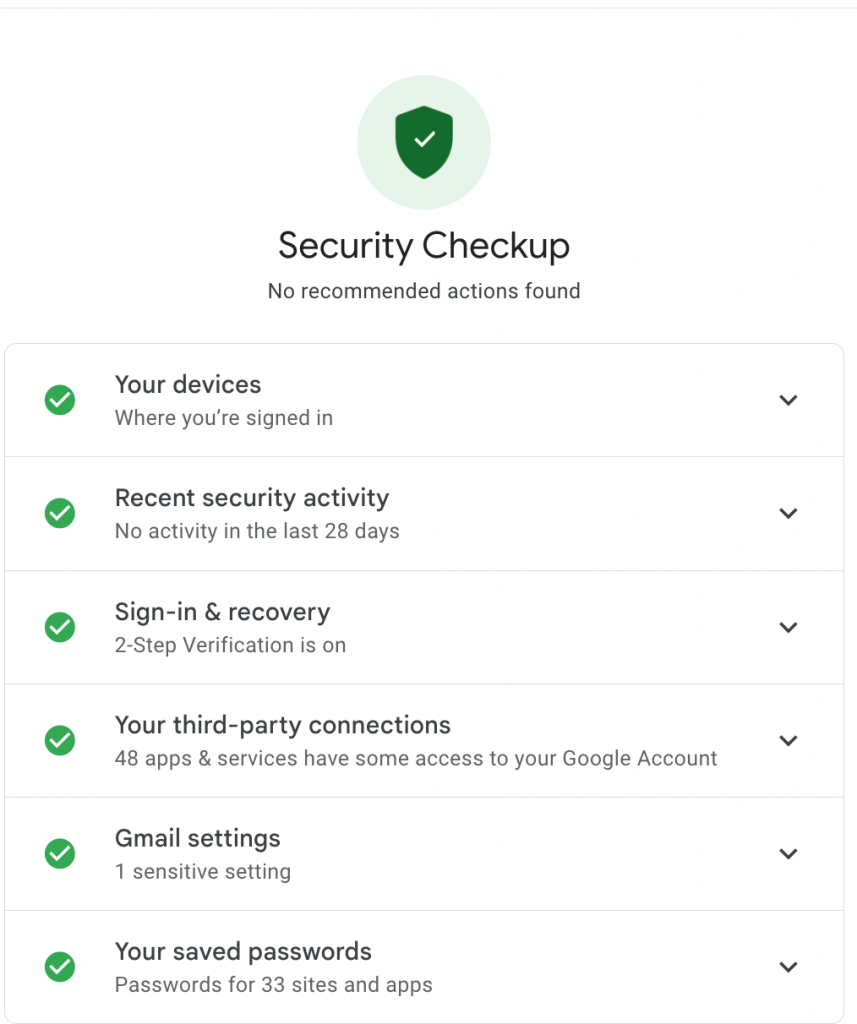
3. Security Checkup: Your Regular Health Scan
What it is: A guided tool from Google that walks you through reviewing important security settings and activity related to your account.
Why use it regularly: It helps you spot suspicious activity, review devices logged into your account, check third-party app access, and ensure your recovery info is correct – all in one place. Think of it as a quarterly security health check.
How to Run It:
- Go directly to the Security Checkup: https://myaccount.google.com/security-checkup
- Follow the prompts to review each section (Your devices, Recent security activity, Third-party access, etc.).
- Address any warnings or recommendations provided. Green checkmarks are good!
Best Practice: Make it a habit to run the Security Checkup every few months or whenever you suspect unusual activity.
Take Action Now—Not After a Breach
The average cost of a data breach is now over $4.45 million. More importantly, the personal stress and professional impact of a compromised account can last for months. Your account security is a shared responsibility. Taking just 10-15 minutes now to review and configure these settings can save you significant trouble down the road.
Click here to manage your Google Account Security: https://myaccount.google.com/security
Stay secure and productive!