


How to create externally friendly booking pages with appointment scheduling and appointment slots in Google Calendar
We have all wanted to book or set an appointment with other people: your manager, a sales call, or a simple doctor’s visit. Well, how about we make it easier for them and yourself to book appointments with these people. This will help both you and them from the hustle of back and forth via emails, calls, etc. Google Calendar recently introduced appointment scheduling that allows you to schedule appointments.
The appointment scheduling feature allows you to share your availability via a booking page, which can be used by external stakeholders, clients, and partners to schedule time. This is an addition to the already existing appointment slot in Google Calendar, which will eventually be replaced by appointment scheduling in the near future.
Appointment slots and appointment schedules are different features. Google Workspace users can make use of both but Google Workspace Business Starter accounts don’t have access to the new appointment schedules. Appointment slots are useful when you don’t know who needs to meet with you, but you want to make yourself available. You can offer people a block of time on your calendar with which they can book time slots.
The new appointment scheduling feature is suited for external use cases, allowing external users, including those without a Google account, to schedule meetings. Additionally, with automatic conflict detection with existing Calendar events, this feature helps reduce time spent finding and rescheduling appointments.
With appointment schedules, you can:
- Create and share booking pages
- Block off time so people can book appointments with you
- View your booked appointments in Google Calendar
So, What is the difference between appointment scheduling and appointment slots?
The new appointment Schedules offer the following improvements over appointment slots:
- Use your own professional booking page: With Appointment scheduling, you can create a professional-looking page for the different appointments you offer. This way anyone with an email address can book an appointment with you and your booking pages are automatically updated to avoid conflicts with other events on your calendar.
- Get appointment email notifications. You get a booking confirmation and update emails.People who book an appointment with you can also receive an automatic reminder email before the appointment.
- Choose how you meet: You can customize how you meet with your customers and clients either in In-person, on the phone, or over a Google Meet video conference and if you choose to meet over video conference, a Google Meet link is automatically added to your appointments.
- Customize your appointment availability. With appointment scheduling, you can limit how people who book early or last-minute appointments with you by setting the available time when your schedule starts or ends, limiting the number of appointments per day, and customizing the buffer time in between each appointment.
When to use an Appointment Slot vs Appointment Schedule?
In your Google Calendar Settings, you can switch between the old appointment slots and the new appointment schedules at any time. Any previously created slots or schedules remain active and available whether appointment schedules are turned on or off. For the early access period, old appointment slots and new appointment schedules co-exist on your calendar.
- Add additional team members: You can’t add additional team members to your appointment schedule so that they’re automatically added to booked appointments. With the new appointment schedules, you must add additional team members manually after someone books an appointment.
- Secondary or delegate calendar support: You can’t set up appointment slots on a secondary, team, or coworker’s calendar you manage.
- Conference room booking: You can’t pre-reserve a conference or meeting room on your appointment schedule, but you can add the room to a booked appointment.
How to create an Appointment Schedule?
- On your computer working on any supported browser, open Google Calendar. At the top left, click Create Add and click Appointment Schedule.
- Enter a title for the schedule; this title is visible to anyone who has the link to your booking page and appears on your calendar for schedules and bookings.
- To set your appointment durations, select the drop-down arrow under Appointment duration, by default, this is set to 30 min but you can customize this depending on how long you would like each appointment to last.
- Select the date and time for your appointments this can be a one-time appointment or a recurring schedule.For my case I want to set the appointment day to be on Thursday, you can also customize the time you want to appointments to run from i.e 9am to 5 pm etc
- Set how far in advance appointments can be booked; next to Scheduling window, click the Down arrow. By default, someone can book an appointment with you anywhere from 12 hours to 60 days in advance
- To add a buffer time in between the appointments and the number of appointments per day click the drop-down next to Booked appointment settings. Under Buffer Time you can customize the duration in between the appointments by selecting and customizing the duration either in minutes or hours.
- To Limit the number of maximum bookings per day, select the checkbox under Maximum booking per day and customize the number once done, click Next
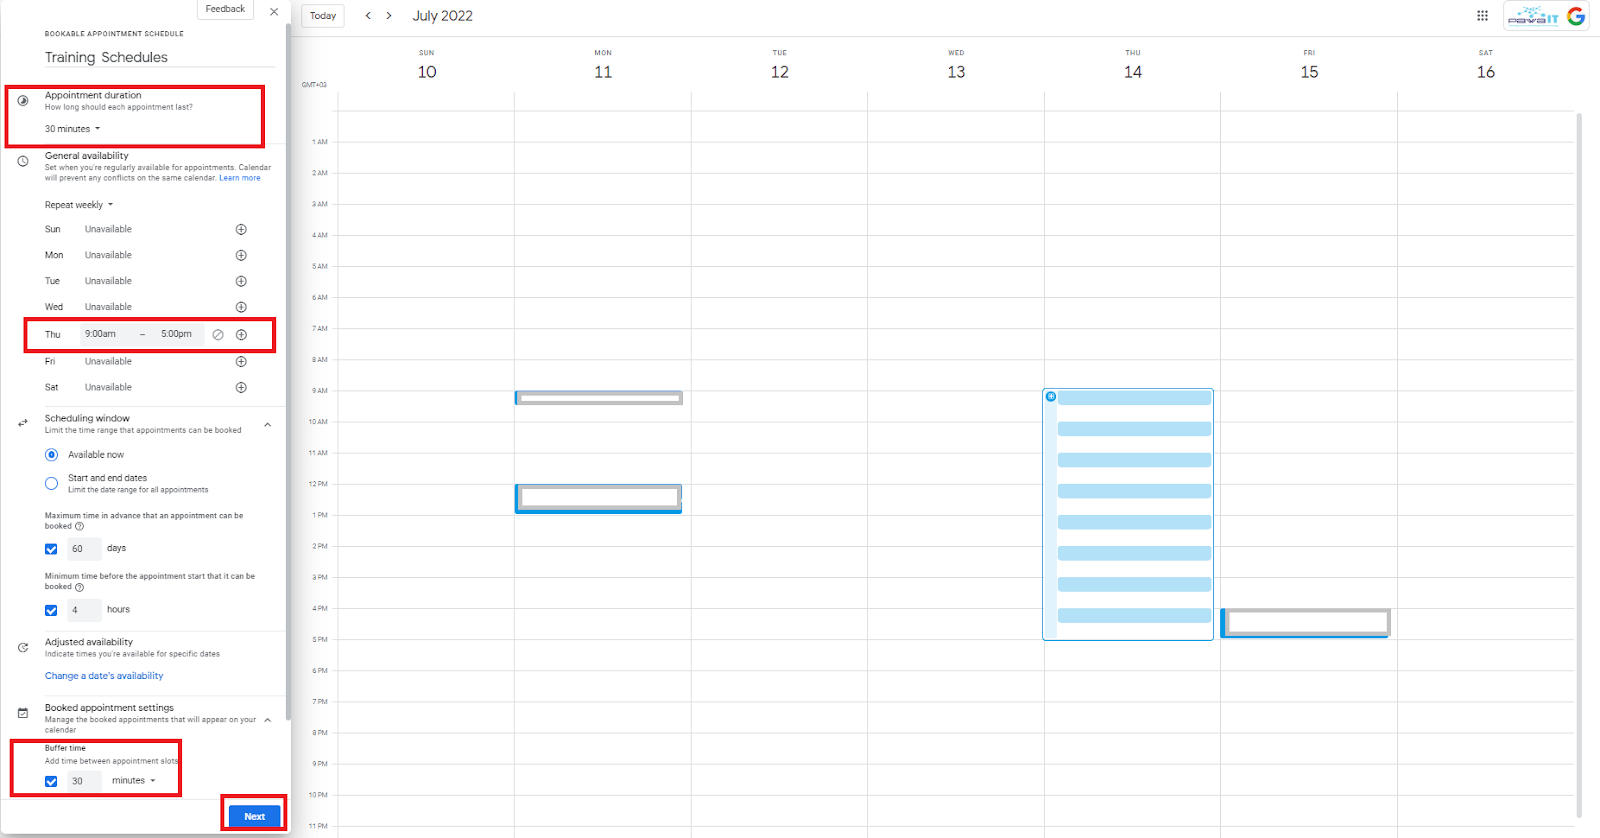
Creating an appointment schedule
- On the next screen, Under Location and Conferencing, you can choose the location for your appointments by selecting the drop-down arrow. This can be either an in-person meeting, a Phone call, or a Google Meet video call, or you can select None/to be specified later. If you choose the location to be a Google Meet event, a meet link will be generated for each appointment after booking
- You can add a description to give details about the appointment or event under Description; this will appear on your booking page, in confirmation emails, and in the event description on Google Calendar.
- To customize the form people use to book an appointment with you, select the drop-down arrow next to Booking Form by default; the form includes First Name, Last Name, and Email address you can also add a requirement for the field for a phone number as a custom field.
- To add or edit the reminder emails both you and the attendee get, click on Booking confirmations and reminders below Email reminder, click the down arrow, and choose when you want the reminders to be sent out this can be one day before or even 10 minutes before the start of the event save the reminder time, and click Done. Note you can set unlimited reminders.
- Once done creating the appointment schedules, click Save.

Creating an appointment schedule
- Now you can share the link to your appointment Booking Page. Select the created appointment times on your calendar and copy the link to the Booking page, which can be shared as a link within an email.
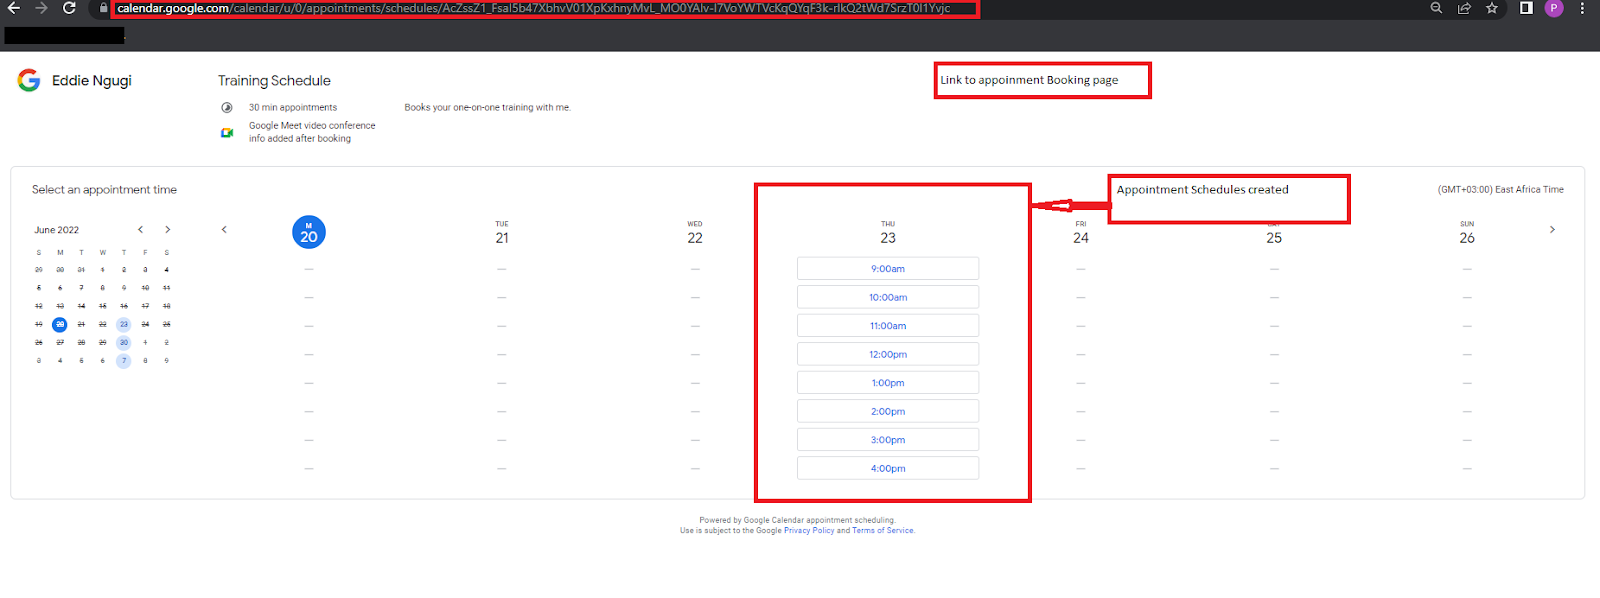
Appointment booking page
Note: How appointment schedule visibility works
- If you share your calendar with others, they can’t view your appointment schedule.
- Anyone with your booking page link can view the times you’re available.
- If you share your booking page, but not your calendar, others can’t view events on your calendar.
Reserve your appointment
Any person with an email address can book an appointment with you as long as they have access to the appointment booking page;
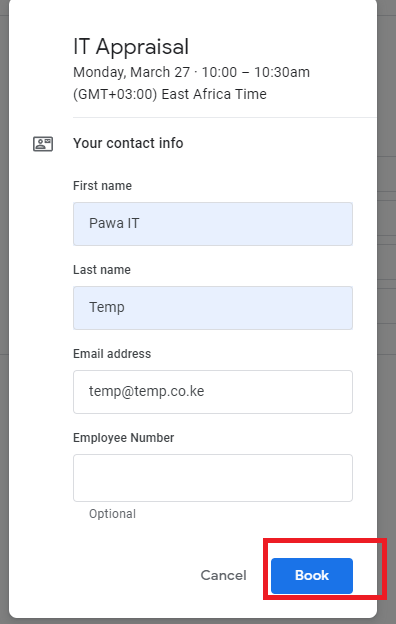
A user booking an appointment
How to create an appointment slot?
Appointment slots are useful when you don’t know who needs to meet with you but you want to make yourself available. You can offer people a block of time on your calendar that they can book time slots within.
Depending on your Google Workspace plan, you might need to switch from appointment scheduling to appointment slots :
- On your computer working on any supported browser, open Google Calendar.
- At the top left, click on Settings.
- On the right, under General, select Appointment schedules
- Under Appointment schedules, unselect the check box next to Create appointment schedules instead of appointment slots to turn off appointment schedules.
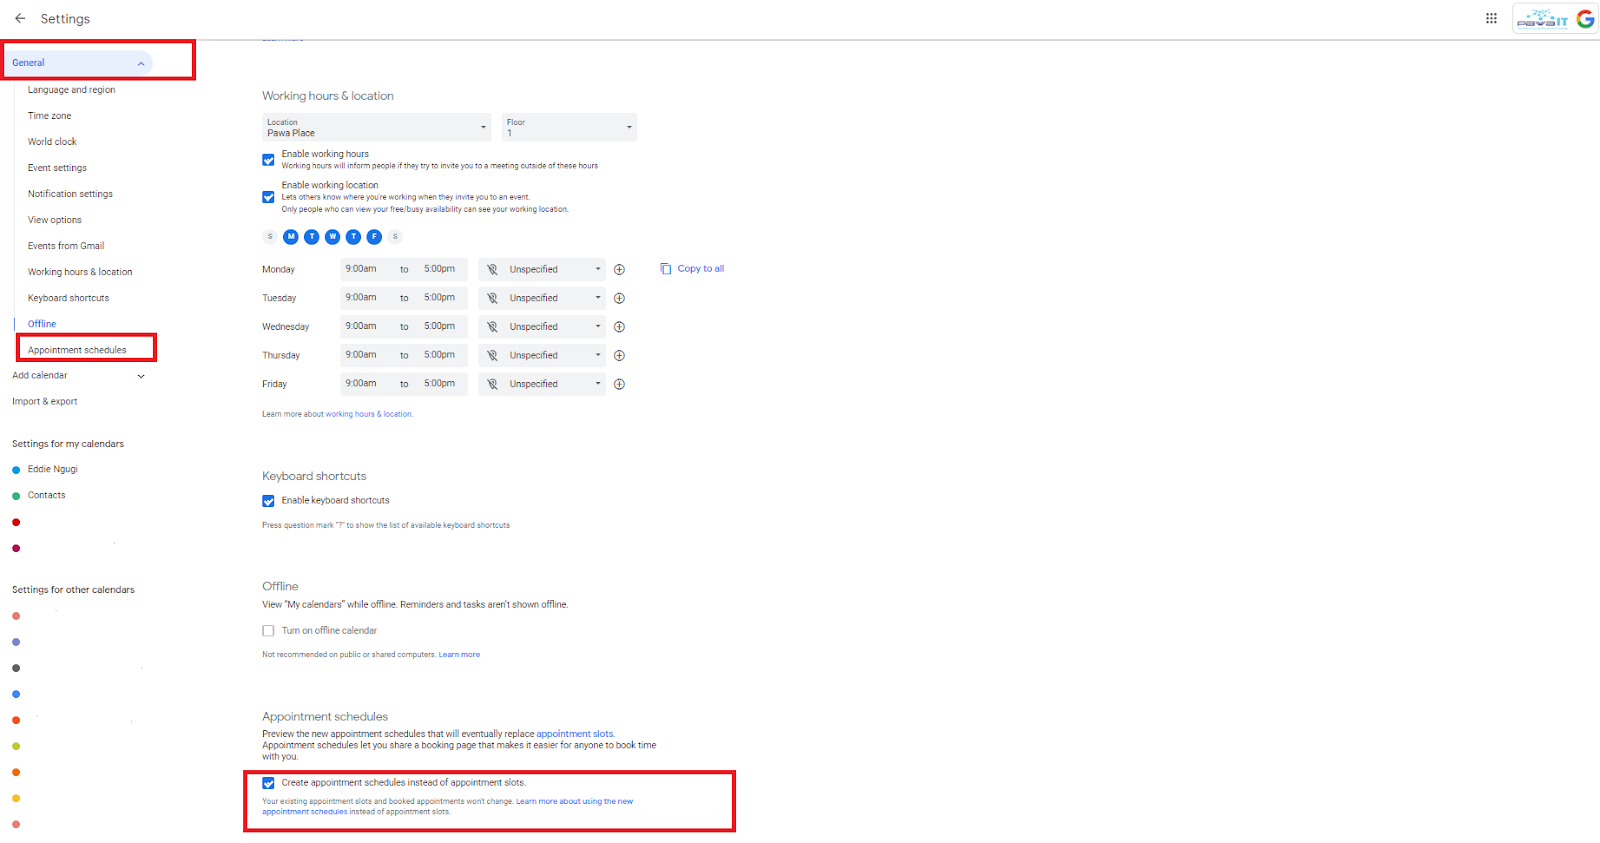
Turn off the appointment Schedule
- Once done refresh the page and proceed to create your appointment slots.
Create an appointment Slots.
- Access Google Calendar with your Google Workspace account
- Make sure that you’re in Week view or any Day view.
- Click anywhere in the calendar. In the event box that pops up, click Appointment slots.
- Click More Options. Enter the details, including a title, the date, and time, and select either a Single Slot or slots with durations; for slots with duration, you can set the duration for each slot.
- Under Event details, Select the calendar where you want the event to show up. As you may have multiple calendars ie. Secondary Calendars or Team Calendars.
- Add a location and a description of the Appointment Slots
- If you want to make the appointment block repeat, do so before you invite others to reserve a slot. When you make an existing appointment block with reserved slots repeat, the reserved slots get duplicated as new slots, and double booking can occur.
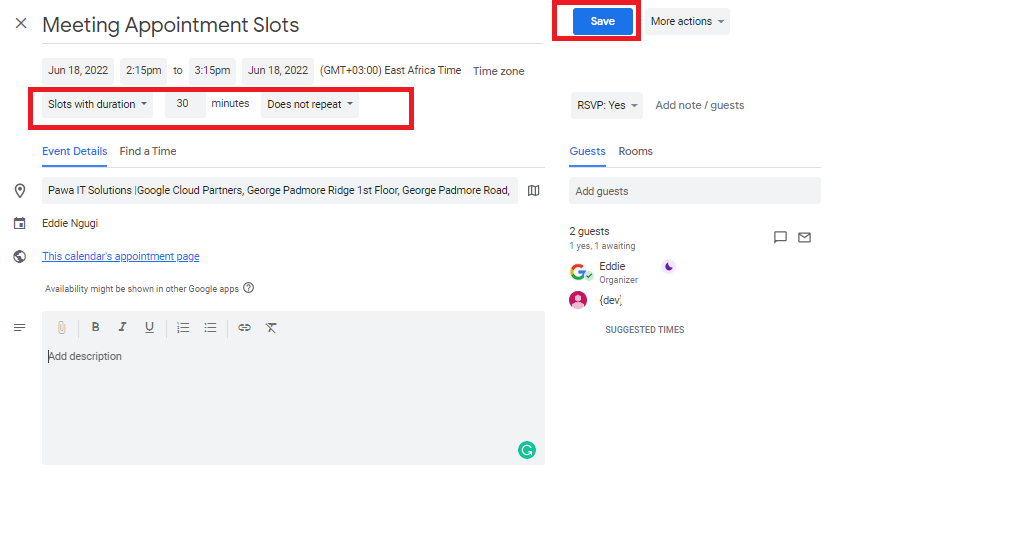
Creating an appointment slot
- To add other people to the appointment block, click Add guests. When you add a guest to the appointment block, the guest gets added to every appointment slot in the block and receives an email each time someone reserves an appointment. Once done, click Save.
- To Invite people to reserve an appointment within the created appointment slots, select the created block and click on the ” Go to appointment page of this calendar. Copy the page URL and share the link with people who want to reserve an appointment.

Appointment slot booking page
Reserve an appointment Slot.
- To reserve an appointment slot, click the link for the appointments page. You can find the link in an email, message, or calendar event that’s been shared with you.
- Click an available appointment slot and click Save.
- Once one reserves a slot, the event owner gets an email that you have reserved a time slot to the event.