


How to enhance your security posture in your enterprise cloud emails: Case for Google Workspace
Episode 4: Data Loss Prevention (DLP) for Drive
In this episode of enterprise cloud security on Google Workspace we will take a look on how to implement DLP for Drive which allows you to create complex rules that combine triggers and conditions. You can also specify an action that sends a message to the user that their content has been blocked.
DLP for Drive helps manage access to services based on:
- Identity and context
- IP Range
- Device Policy
- Disk encryption status
- Screen lock status
- OS Policy – min OS Version, as string
- Different OS – Windows, MacOS, Chrome OS
- Company-owned device
- Serial number
- Geographic origin
DLP for Drive rules and custom content detectors
Step 1: Plan your rules
- Decide on rule conditions – rule conditions determine what kind of sensitive content the rule will detect. using AND, OR or NOT operators you can specify multiple rules
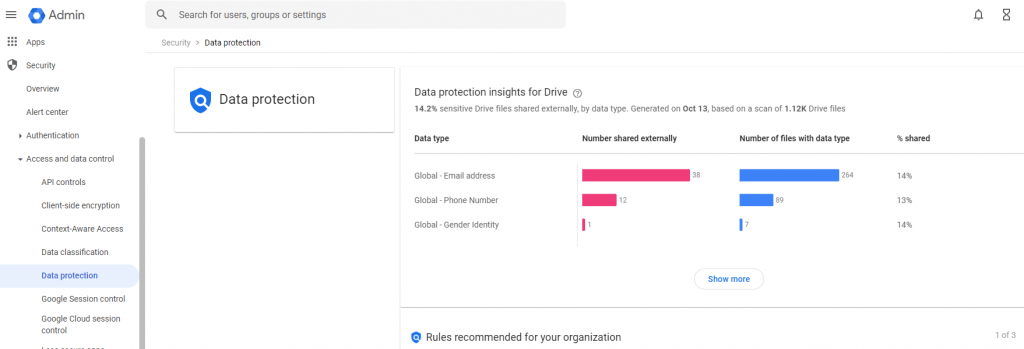
- Recommended rules – DLP rules recommended to you based on the results of the Data protection insights report.
- Rule’s scope groups – you can choose admin- or user-created groups in your Groups list in the Admin console. Examples:
- Dynamic groups— manage memberships automatically when users join, move within, or leave your organization.
- Security groups— helps you regulate, audit, and monitor the group for permission and access control.
- Migrated groups –use Google Cloud Directory Sync (GCDS) to sync groups you create in Microsoft AD or other tools with Google Workspace.
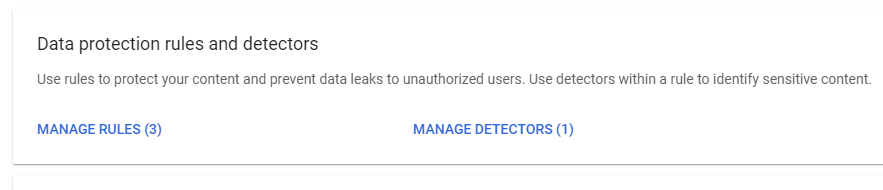
Step 2: Create a custom detector (optional)
- sign in to your super administrator account or a delegated admin account and go to:
- Click Manage Detectors then click Add detector. Add the name and description.
- You can select:
- Regular expression— a method for matching text with patterns.
- Word list— This is a comma-separated list of words to detect.

- Click Create. Later, use the custom detector when you add conditions to a rule.
Step 3: Create rules
- In the Admin console, go to data protection section shown in step 2 above.
- Click Manage Rules. Then click Add rule -> New rule or click Add rule -> New rule from template. Select a template from the Templates page
- In the Name section, add the name and description of the rule.
- In the Scope section, choose All in <domain.name> or choose to apply this rule only to users in selected organizational units or groups then click Continue.

- In the Apps section, choose the trigger for Google Drive, File created, modified, uploaded or shared and Click Continue

- In the Conditions section, click Add Condition.
- Choose the Content type to scan:
- All content: All of the document, including the document title, body, and any suggested edits.
- Body: Body of the document
- Drive label: Any labels applied to the document.
- Suggested edits: Content added to the document while in Suggestions mode

- Choose What to scan for, then fill out the needed attributes for that type of scan.
- Click Continue.
- In the Actions section, you can optionally select the action to occur if sensitive data is detected in the scan:
- Want to test a rule before adding an action to it

- In the Alerting section, choose a severity level (Low, Medium, High).
- Click Continue and review the rule details.
- In Rule status, choose an initial status for the rule and click create.
- Active—Your rule runs immediately.
- Inactive—Your rule exists, but does not run immediately

Step 4: Communicate to users about the new rule – set user expectations as to behavior and consequences of the new rule.
Stay tuned, in our next episodes, we shall cover topics in the following areas:
- Deleting Accidental Sent emails in your domain
- Security Center: Investigation tool
- Google EMM: Remote Wipe Devices: Windows, Android and iPhone